

Ropsten Ethereum Faucet: JSON Web Service
Motivation
This series of tutorial documents my process of building an Ethereum faucet on the Ropsten Testnet. This is the 3rd article of the series and it explains the codes behind the JSON Web Service. The JSON Web Service performs the role of dishing out free ETH when the requester provides his Ethereum wallet address and the number of ETHs he wishes to receive.
- Ropsten Ethereum Faucet: How it works
- Ropsten Ethereum Faucet: Smart Contract
- Ropsten Ethereum Faucet: JSON Web Service
- Ropsten Ethereum Faucet: Web App
The source codes for this project are in the project's Github repository and the faucet smart contract is accessible here.
Why Node?
When building DApps, a developer would likely adopt the typical architecture where a DApp built with the Web3 library will interact with a Solidity Smart Contract on the Blockchain. So why is my faucet developed with NodeJS? I decided against the DApp architecture because users who wanted ETHs would likely not have any to begin with. To ask a user who needs ETHs to connect his ETH wallet (such as MetaMask) to a DApp to make a ETH request isn't so logical since he needs ETHs to spend on gas to begin with!.
Thus, it is mandatory that the backend to the Faucet Web App does everything it needs to give away ETH. This includes funding the transaction call to transfer ETHs from the faucet to the requester's wallet. The faucet must hold ETHs and also pay for the transaction to transfer ETHs to the requester.
Codes Explained
The complete source code for the Faucet backend can be accessed here.
var express = require("express"),
  parser = require("body-parser"),
  http = require("http");

var Web3 = require("web3"),
  webtx = require("ethereumjs-tx");
Lines 1 to 6 states the libraries used. The faucet backend is a JSON Web Service. The express, parser and http libraries are used to let it listen to API calls. The web3 library allows the faucet web service to read from and send transactions to the Ethereum blockchain.
var web3 = new Web3(
  new Web3.providers.HttpProvider('https://ropsten.infura.io/v3/<your api key>')
);
Lines 8 to 10 defines the use of the Web3 library to connect to the Ethereum Ropsten Testnet blockchain using Infura. To get your API key to Infura, just request for a free account.
var walletaddress = "<your wallet address>";
var key = "<your wallet private key>";
Lines 12 and 13 define the wallet address and the private key to the faucet's wallet. The walletaddress variable stores the address of the wallet where you will fund the transactions to transfer ETH from the faucet to requesters. The wallet address of the wallet that I used for this demo is 0xe80b936869E0F9E0097d48bD179A140D0E7dAcF4.
The key variable stores this wallet's private key. You need to provide the wallet's private key as this is where gas to perform the ETH transfer between the faucet and the requester will be spent from. The way to obtain your wallet's private key depends on how you created the wallet. If you have created this wallet with MetaMask, simply view the wallet's "Account Details", followed by [Export Private Key]. Copy and paste the private key into this variable.

var myinterface = [
  {
    constant: false,
    inputs: [],
    name: "receive",
    outputs: [],
    payable: true,
    stateMutability: "payable",
    type: "function"
  },
...
];
Lines 14 to 70 define the interface to the Faucet Smart Contract. I have explained the codes for the Faucet Smart Contract in the previous tutorial at Ropsten Ethereum Faucet: Smart Contract.
var faucetaddress = "0x0Cc0782E381ACf8840ebeA88Bab61865043F2D3C";
Line 17 defines the faucet's address on the Ropsten Testnet. You may look at it here.
var app = express();
app.use(parser.json());
app.use(parser.urlencoded({ extended: true }));
app.use(function(req, res, next) {
  res.setHeader("Access-Control-Allow-Origin", "*");
  res.setHeader(
    "Access-Control-Allow-Methods",
    "GET, POST, OPTIONS, PUT, PATCH, DELETE"
  );
  res.setHeader(
    "Access-Control-Allow-Headers",
    "X-Requested-With,content-type"
  );
  res.setHeader("Access-Control-Allow-Credentials", true);
  next();
});

app.set("port", process.env.PORT || 5000);
Lines 73 to 90 start the Faucet as a JSON Web Service to wait for web service calls from ETH requesters.
Helper Function to Execute Smart Contract Transaction
const executeContractTransaction = async (
  _contractAddress,
  _wallet,
  _encodedABI,
  _key,
  _gasLimit,
  _gasPrice,
  _gas,
  contractTransactionExecutedCallback
) => {
  web3.eth.getTransactionCount(_wallet).then(txCount => {
    const txOptions = {
      from: _wallet,
      to: _contractAddress,
      nonce: web3.utils.toHex(txCount),
      gasLimit: web3.utils.toHex(_gasLimit),
      gasPrice: web3.utils.toHex(_gasPrice),
      gas: web3.utils.toHex(_gas),
      data: _encodedABI
    };
    var tx = new webtx(txOptions);
    var privateKey = new Buffer(_key, "hex");
    tx.sign(privateKey);
    var serializedTx = tx.serialize();

    web3.eth
      .sendSignedTransaction("0x" + serializedTx.toString("hex"))
      .on("confirmation", (confirmationNumber, receipt) => {
        console.log("=> confirmation: " + confirmationNumber);
      })
      .on("transactionHash", hash => {
        console.log("=> hash");
        console.log(hash);
      })
      .on("error", console.error)
      .then(receipt => {
        //console.log('=> reciept');
        //console.log(receipt);
        contractTransactionExecutedCallback(receipt);
      });
  });
};
Lines 93 to 133 is my code for the JavaScript helper function executeContractTransaction. I clobbered this function together to simplify the calling of Smart Contract functions on the blockchain. To make a call, you will provide the following:
_contractAddress: The address of the Smart Contract that you are executing._wallet: The address of the wallet that you will use to fund this transaction._encodedABI: The actual Smart Contract function that you are calling, encoded in the form stated in the ABI of your Smart Contract (in this example it is the interface to the Faucet smart contract defined in lines 14 to 70).- _key: The private key of your wallet.
_gaslimit: The Gas Limit is the maximum amount of gas that you are willing to pay for performing this transaction._gasPrice: This is the amount of Gwei that you are willing to spend on each unit of gas._gas: Gas is what you will pay to execute this transaction.- _contractTransactionExecutedCallback: The
executeContractTransactionfunction is asynchronous because it takes time to execute and your ETH requester isn't going to be very happy if you are going to block him and wait for the transaction to complete. When the transaction is done executing, it will call the function that you provides here.
Checking ETH balance in the Faucet
app.post("/ethers", function(req, res) {
  try {
    web3.eth.getBalance(faucetaddress).then(balance => {
      res.setHeader("Content-Type", "application/json");
      res
        .status(200)
        .send(
          JSON.stringify({ ethbalance: web3.utils.fromWei(balance, "ether") })
        );
    });
  } catch (err) {
    var obj = { ethbalance: -1 };
    res.setHeader("Content-Type", "application/json");
    res.status(200).send(JSON.stringify(obj));
  }
});
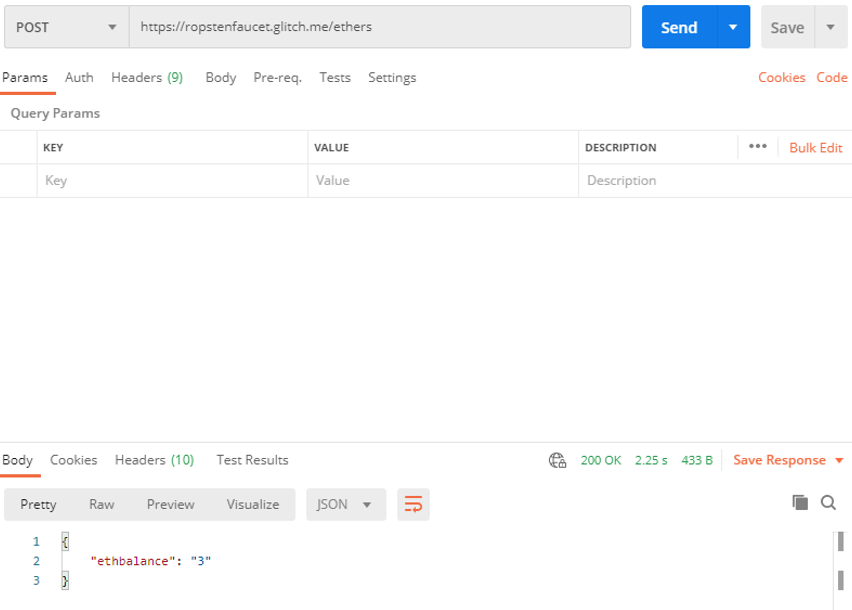
Lines 146 to 161 provide the total amount of ETHs that the faucet currently owns. It uses the web3.eth.getBalance(faucetaddress) function to query the faucet address for the amount of ETHs that it holds and returns it to the caller.
You may test this web service-call with Postman and note its response.
Sending ETH from Faucet to Requester
app.post("/sendethers", async function(req, res) {
  if (
    typeof req.body.receiver == "undefined" ||
    typeof req.body.request == "undefined"
  ) {
    res.setHeader("Content-Type", "application/json");
    res
      .status(400)
      .send(
        JSON.stringify({
          result: "error",
          msg: "error in receiver and/or request fields"
        })
      );
    return;
  }

  let receiver = req.body.receiver;
  let request = req.body.request;

  console.log(receiver);
  console.log(request);

  try {
    const contract = new web3.eth.Contract(myinterface, faucetaddress);

    const query = contract.methods.send(receiver, request);
    const encodedABI = query.encodeABI();

    let myeth_old, myeth_new;

    await web3.eth.getBalance(receiver).then(balance => {
      myeth_old = web3.utils.fromWei(balance, "ether");
    });

    const contractTransactionExecuted = async receipt => {
      await web3.eth.getBalance(receiver).then(balance => {
        myeth_new = web3.utils.fromWei(balance, "ether");
      });

      var obj = { ethsent: myeth_new - myeth_old };
      res.setHeader("Content-Type", "application/json");
      res.status(200).send(JSON.stringify(obj));
    };

    executeContractTransaction(
      faucetaddress,
      walletaddress,
      encodedABI,
      key,
      9000000,
      20000000000,
      5000000,
      contractTransactionExecuted
    );
  } catch (err) {
    var obj = { ethsent: -1 };
    res.setHeader("Content-Type", "application/json");
    res.status(200).send(JSON.stringify(obj));
  }
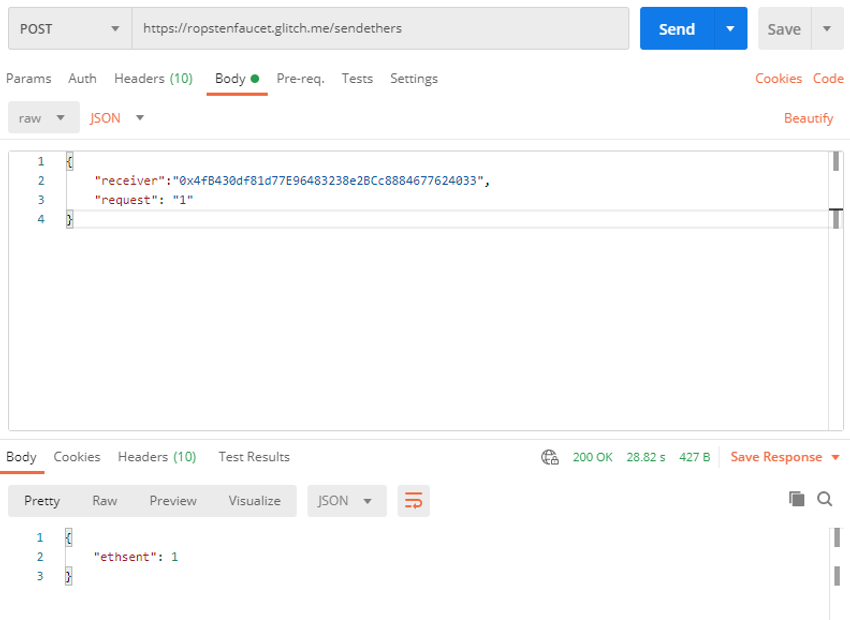
Lines 165 to 224 define /sendethers, which is the web service function that performs the role of sending ETHs from your faucet to the requester.
const contract = new web3.eth.Contract(myinterface, faucetaddress);

const query = contract.methods.send(receiver, request);
const encodedABI = query.encodeABI();
A new contract based on the interface stated in lines 14 to 70 to be executed at faucetaddress 0x0Cc0782E381ACf8840ebeA88Bab61865043F2D3C is defined. Then a query that will execute the faucet's smart contract function send is defined. This is then encoded into encodedABI.
await web3.eth.getBalance(receiver).then(balance => {
  myeth_old = web3.utils.fromWei(balance, "ether");
});
We find out how much ETHs are there in the faucet and store this information in myeth_old.
executeContractTransaction(
      faucetaddress,
      walletaddress,
      encodedABI,
      key,
      9000000,
      20000000000,
      5000000,
      contractTransactionExecuted
    );
  } catch (err) {
    var obj = { ethsent: -1 };
    res.setHeader("Content-Type", "application/json");
    res.status(200).send(JSON.stringify(obj));
}
Finally we call the Smart Contract by providing:
faucetaddress: Address of the Faucetwalletaddress: Address of the wallet that will pay for this transactionencodedABI: The encoded Smart Contract function call that will perform the ETH transferkey: The private key of the wallet that will pay for this transaction9000000: Gas Limit20000000000: Gas Price5000000: GascontractTransactionExecuted: This function will be executed after the transaction has been executed successfully
const contractTransactionExecuted = async receipt => {
      await web3.eth.getBalance(receiver).then(balance => {
        myeth_new = web3.utils.fromWei(balance, "ether");
      });

      var obj = { ethsent: myeth_new - myeth_old };
      res.setHeader("Content-Type", "application/json");
      res.status(200).send(JSON.stringify(obj));
};
Upon successful execution of the Smart Contract to transfer ETH to the request, contractTransactionExecuted runs to return the total number of ETHs successfully sent from the faucet to the requester.
You may test this web service-call with Postman.
Deploying the Faucet Web Service
The faucet web service is to be deployed as a NodeJS web service. Here's how to do so to Google Cloud. Alternatively, you may do what I did - I simply copied the codes and the package.json files into Glitch.com to let it run for free!
What's Next?
The source codes for this projects can be found in my Github repository.
In the next part of this tutorial, I will explain the codes behind the Faucet's frontend web application. Stay tuned!
If you enjoyed this tutorial, perhaps you may also wish to read:
- Voting on a Blockchain: An implementation of a Voting DApp on Ethereum.
- Minimum Viable Ethereum Mobile Wallet: A React Native-based template that I constructed for projects that require a mobile Ethereum wallet.
- Deploy a Private Ethereum Blockchain in 10 Minutes with Kaleido: Getting a private Ethereum Blockchain up and running in a jiffy.
- Smart Contract Explained by Demonstration: A demo of an Escrow Service Smart Contract DApp - in my opinion, the fastest way to explain to a layman, what Blockchain is.
- Ethereum IOT Kid Grounding Device: My attempt to incorporate Blockchain with Internet of Things.
- Lottery as a Smart Contract: Distributed Lottery, an attempt to build a lottery system on the Ethereum Blockchain.
Photo by Talal Ahmad on Unsplash
