

The Freelancer's Smart Contract: How It Works
Why a Freelancer's Smart Contract?
I began my career building software for companies as a freelancer in my teens back in the late 90s. It was the best, or worst of times depending on how you see it. Apart from honing my development skills, I learned how to price my service and negotiate terms of payments so that I would be paid in stages as I delivered codes. These were skills I kept dear and near till today.
But it certainly wasn't easy. There was one project that I completed just before I was sent away on 10 weeks' military training. As a result, it was logistically challenging to receive my final payment. Remember that this was the days before Internet banking, so fund transfer was out of the question. I was worried about the cheque getting lost in the mail and insisted to visit the company to collect my payments.
More than 2 decades later, I wondered how a freelancer may use Smart Contracts on the Ethereum Blockchain to ensure that he gets paid for work done.
How It Will Work?
This section describes how the Freelancer Smart Contract will work.
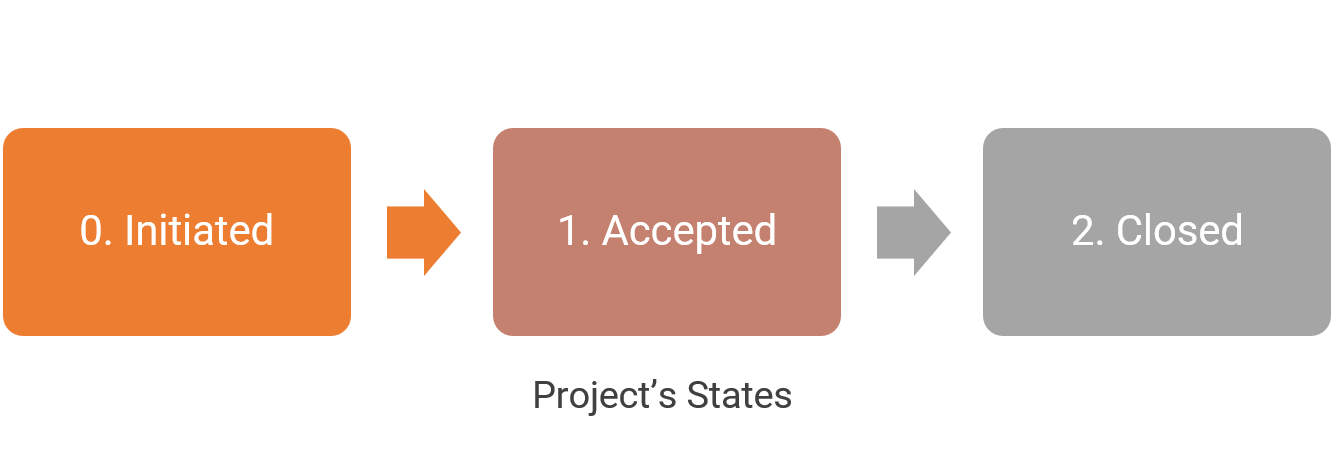
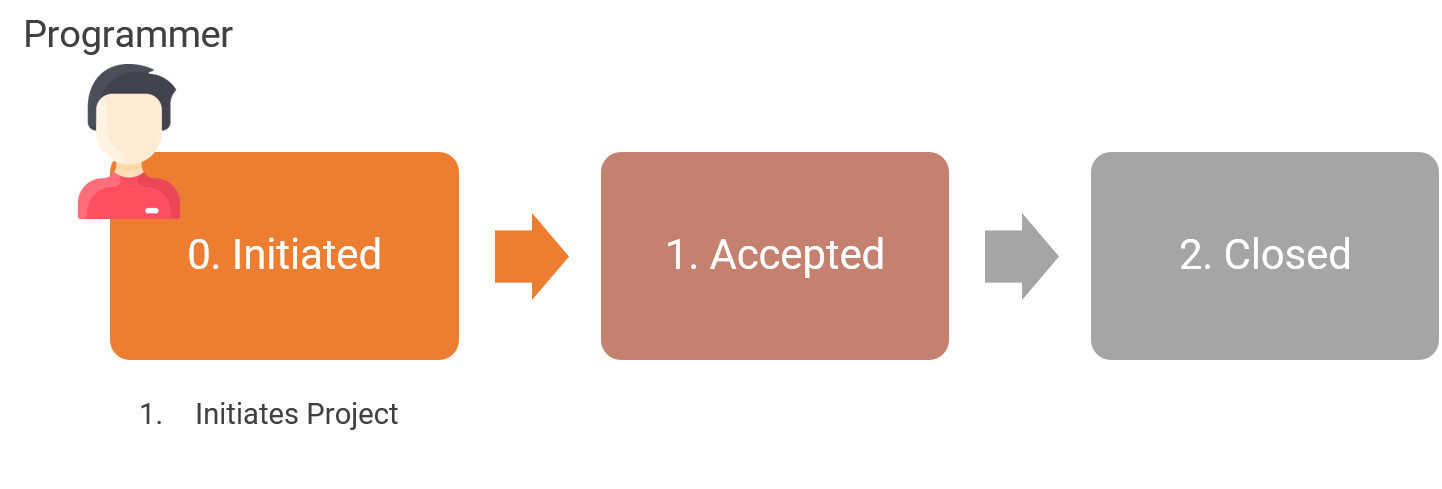
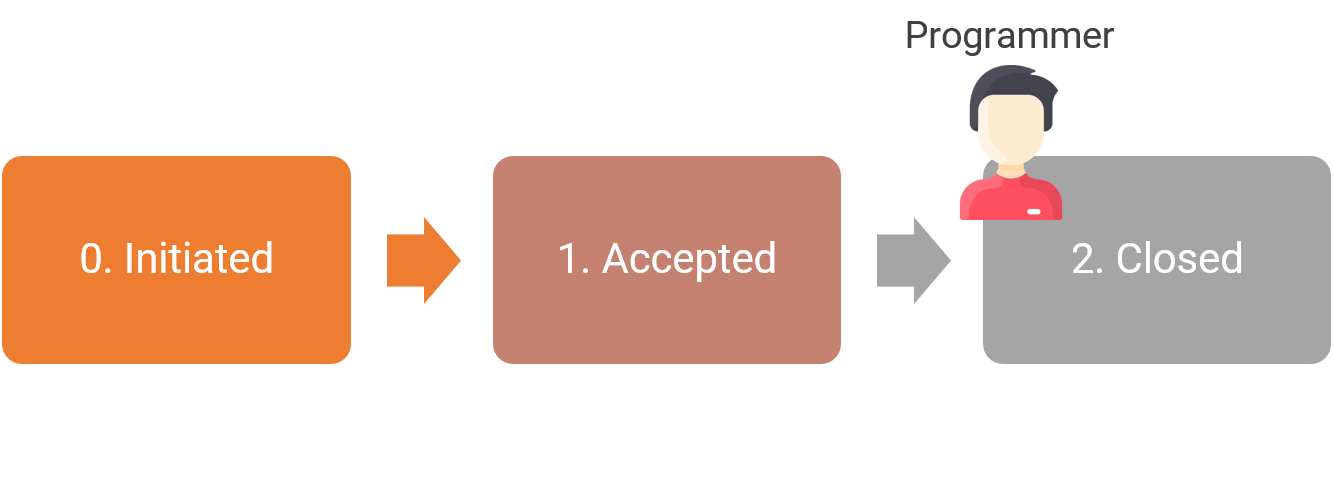
A project follows a process where it is first initiated by the person who's going to be doing the work (let's call this person a programmer, although this Smart Contract applies to any type of freelance work). The project then receives acceptance from the client. The programmer begins working on the project. When he's done, he delivers the work and it is accepted by the client. The project closes.
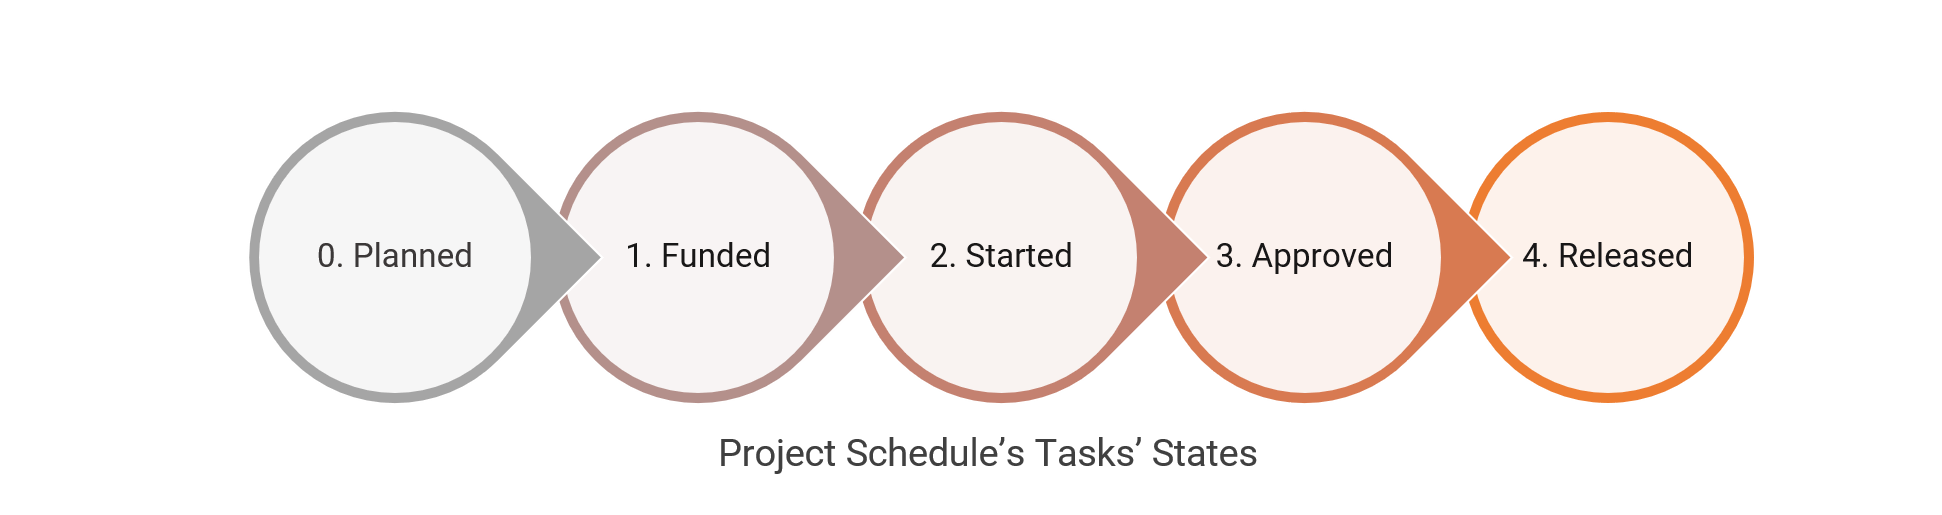
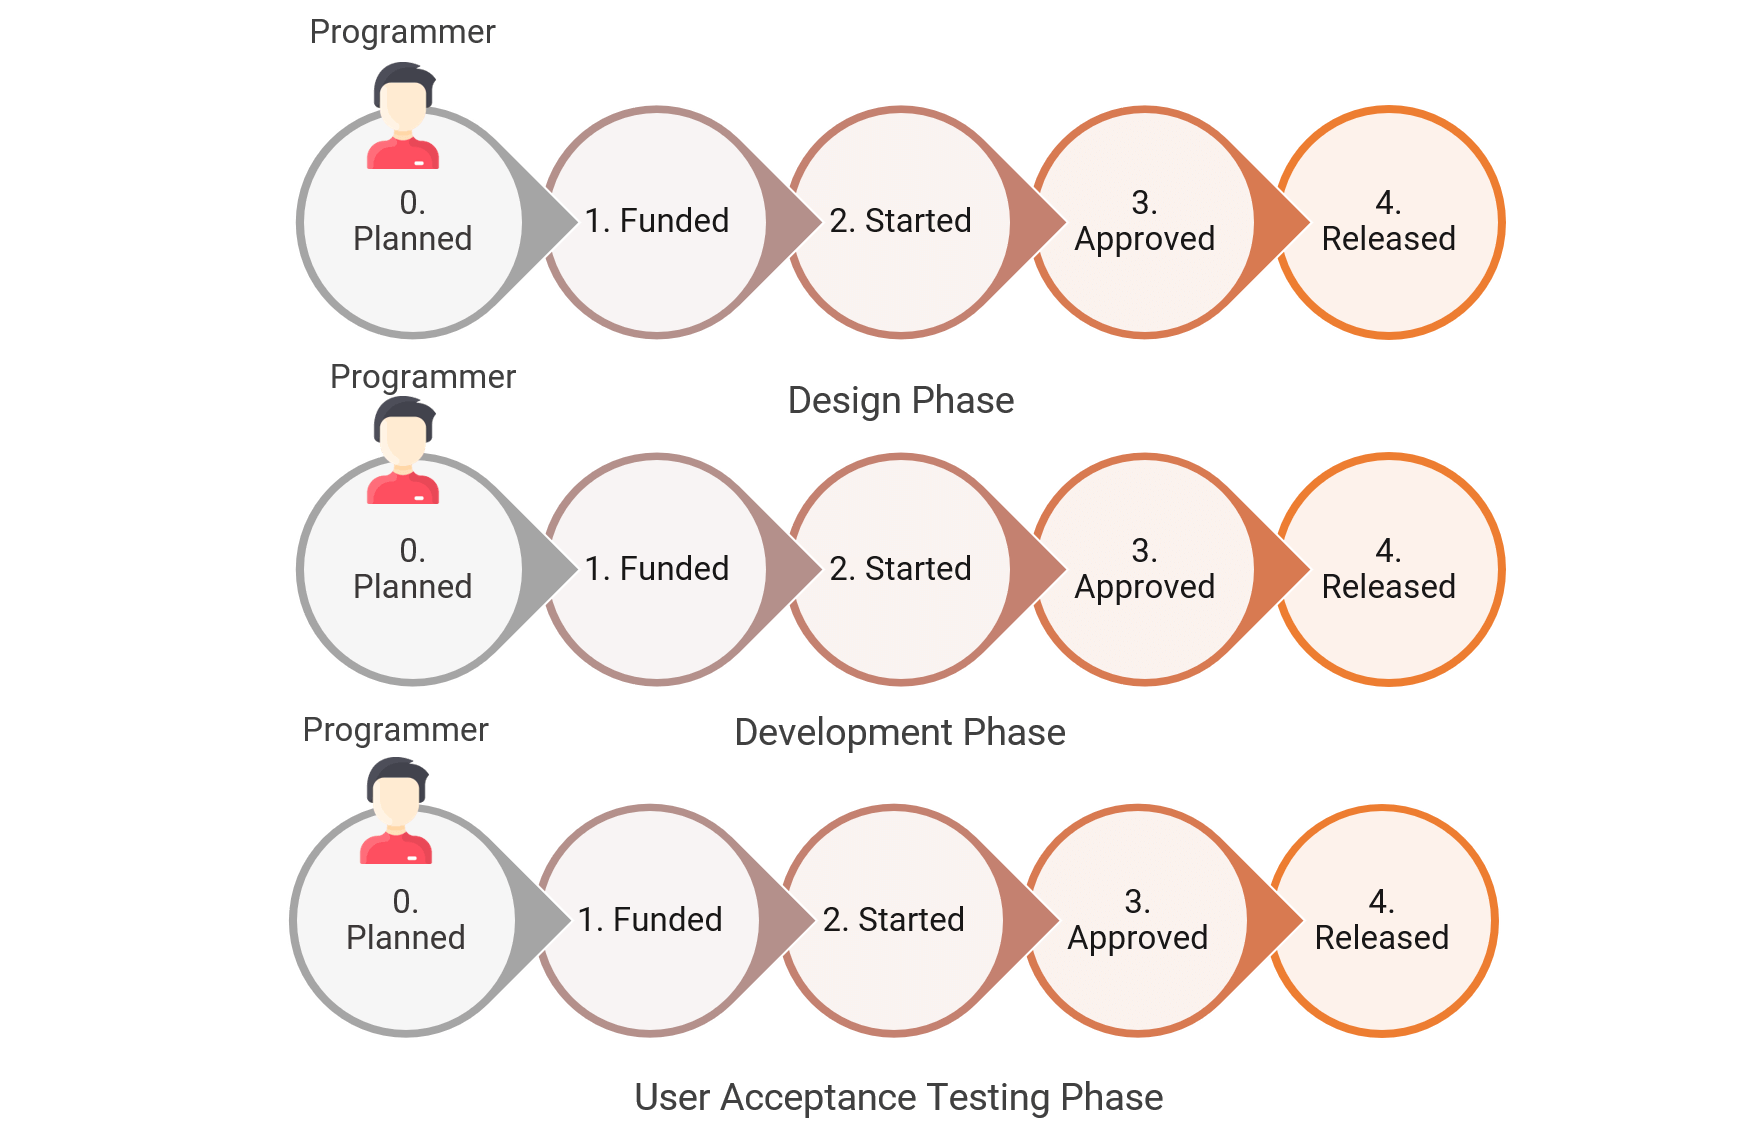
However, the programmer will not want to wait for all the work to be done before he receives any payments. Thus he will break down the project into the various tasks and negotiates payment terms with the client based on the work that he has completed.
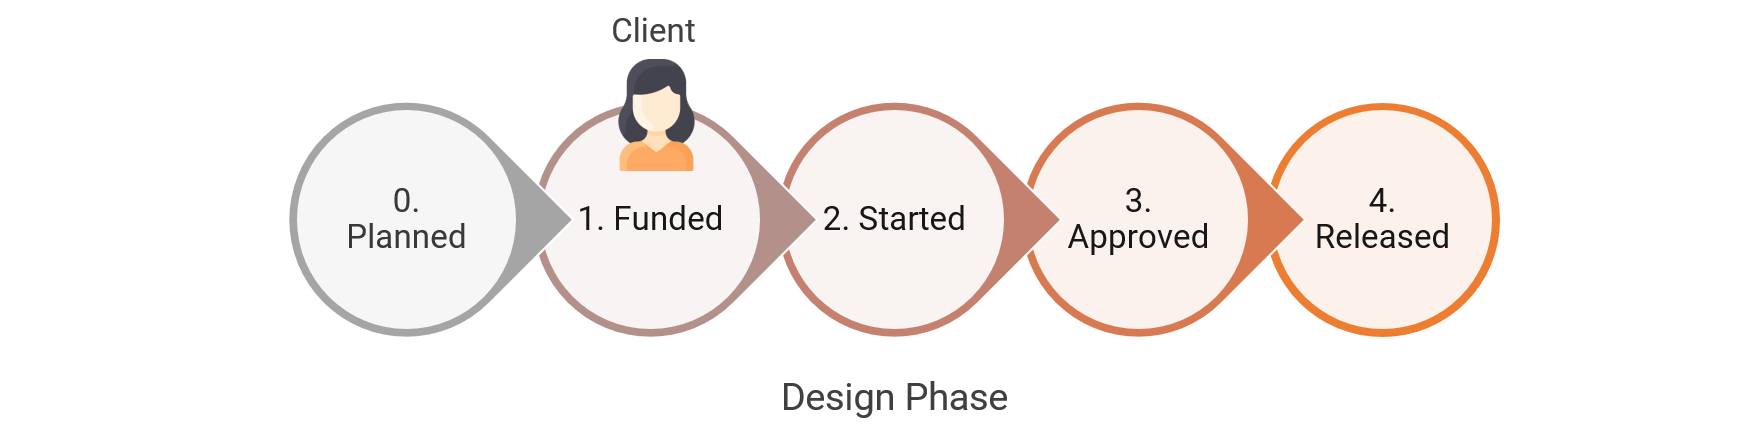
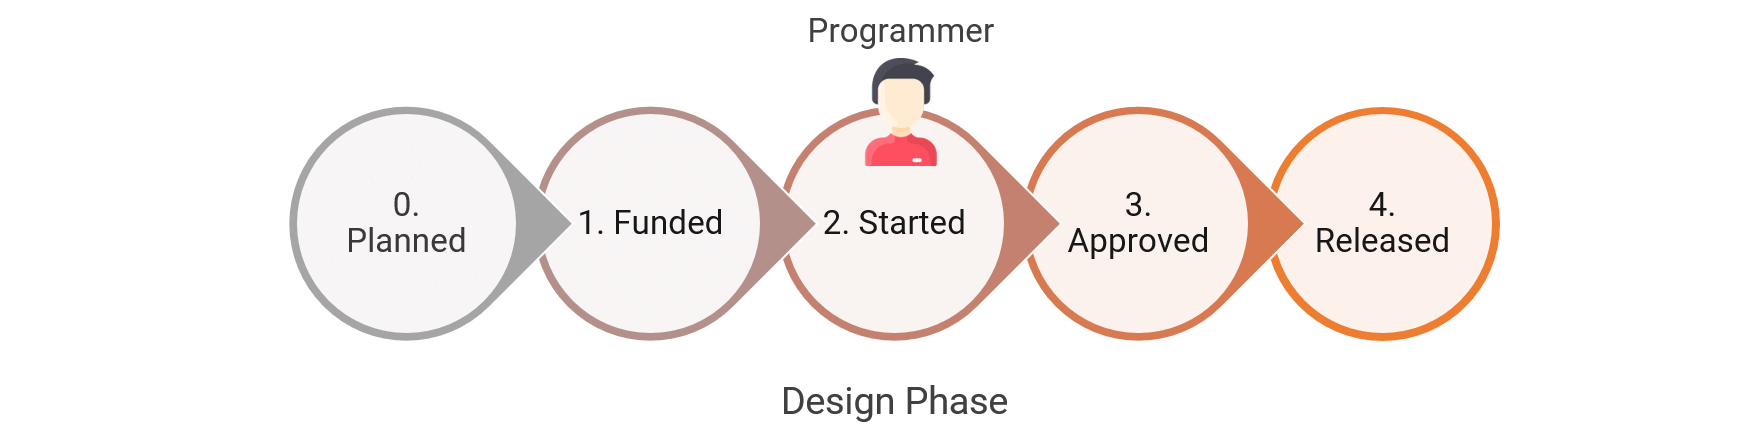
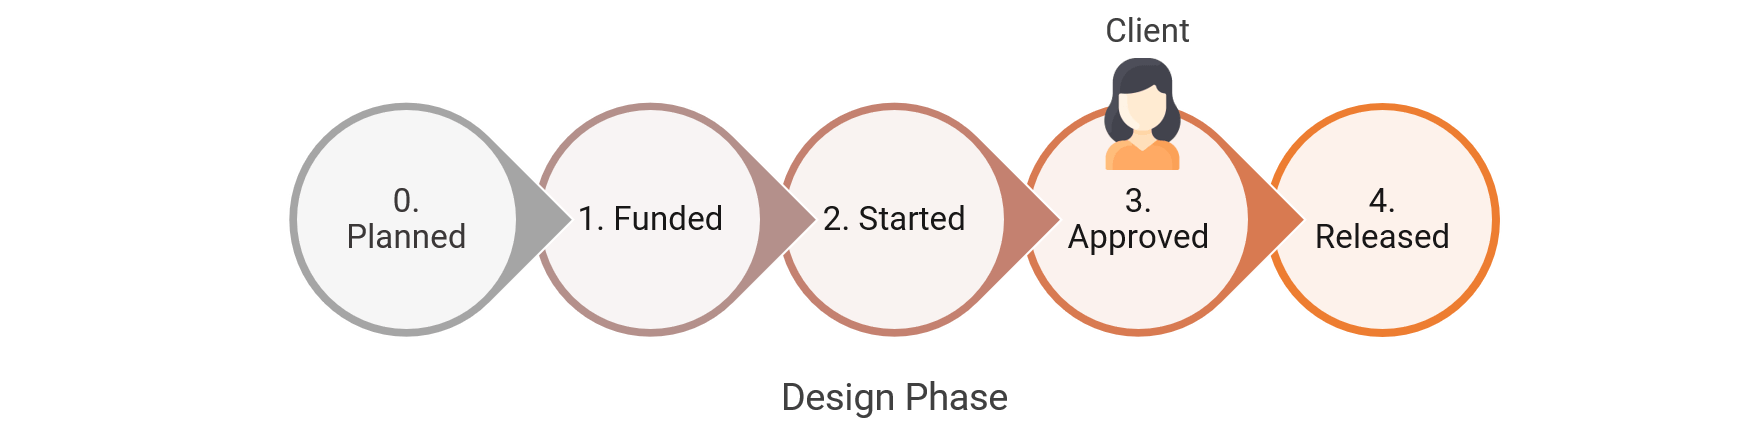
- Planned: He plans the task to be completed and negotiates a payment to receive from the client when it is done. For example, he wishes to receive 1.5 ETH once he hands over the design documents.
- Funded: The client agrees to the programmer's plans and deposits 1.5 ETH into the Smart Contract.
- Started: The programmer checks the smart contract and sees 1.5 ETH. He is well assured that these are the funds that he will receive once the task is done. He starts work. Once he starts working on this task, the Smart Contract does not allow the client to withdraw the 1.5 ETH that he has deposited. Similarly, the Smart Contract does not allow the programmer to withdraw the 1.5 ETH until he has completed this task.
- Approved: When the programmer has handed over the design documents and received approval from the client, the client approves the work.
- Released: The programmer may now ask the Smart Contract to release the 1.5 ETH to him.
A Freelancer's Smart Contract allows the freelancer to manage multiple tasks in this process. Let's examine how the Smart Contract handles lousy clients and programmers:
| Case | How the Smart Contract Handles |
|---|---|
|
|
|
|
|
|
|
|
|
|
Compiling the Freelancer Smart Contract in Remix IDE
You may find the Freelancer Smart Contract on my Github repository. Open Remix.

Create a new file. Call it freelance.sol.
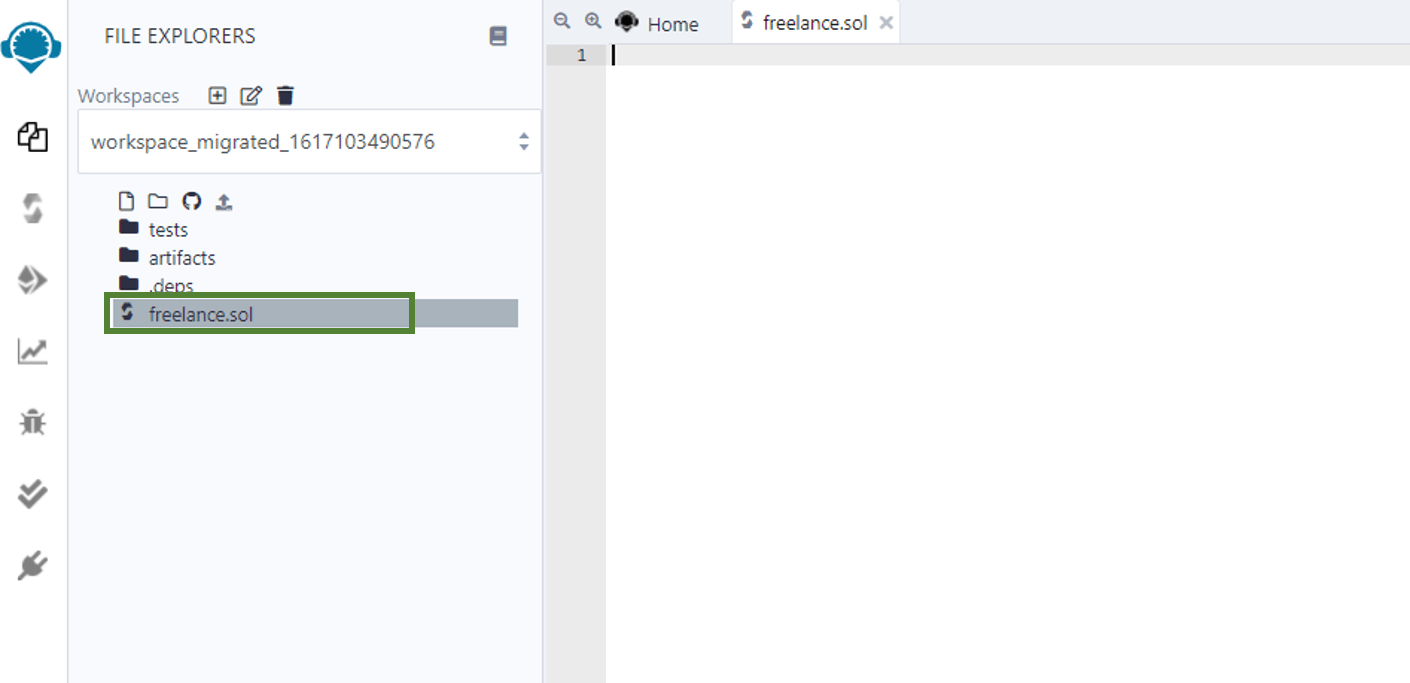
Paste the codes into freelance.sol. Change the compiler version to 0.8.0. Compile freelance.sol.

We are now ready to begin executing the freelance Smart Contract. Ensure that you have MetaMask installed and have created 2 accounts; one for the programmer and another for the client. We will be interchanging between these 2 roles in this demonstration.
Demonstrating the Freelancer Smart Contract
The programmer initiates the project by deploying the Freelancer Smart Contract.
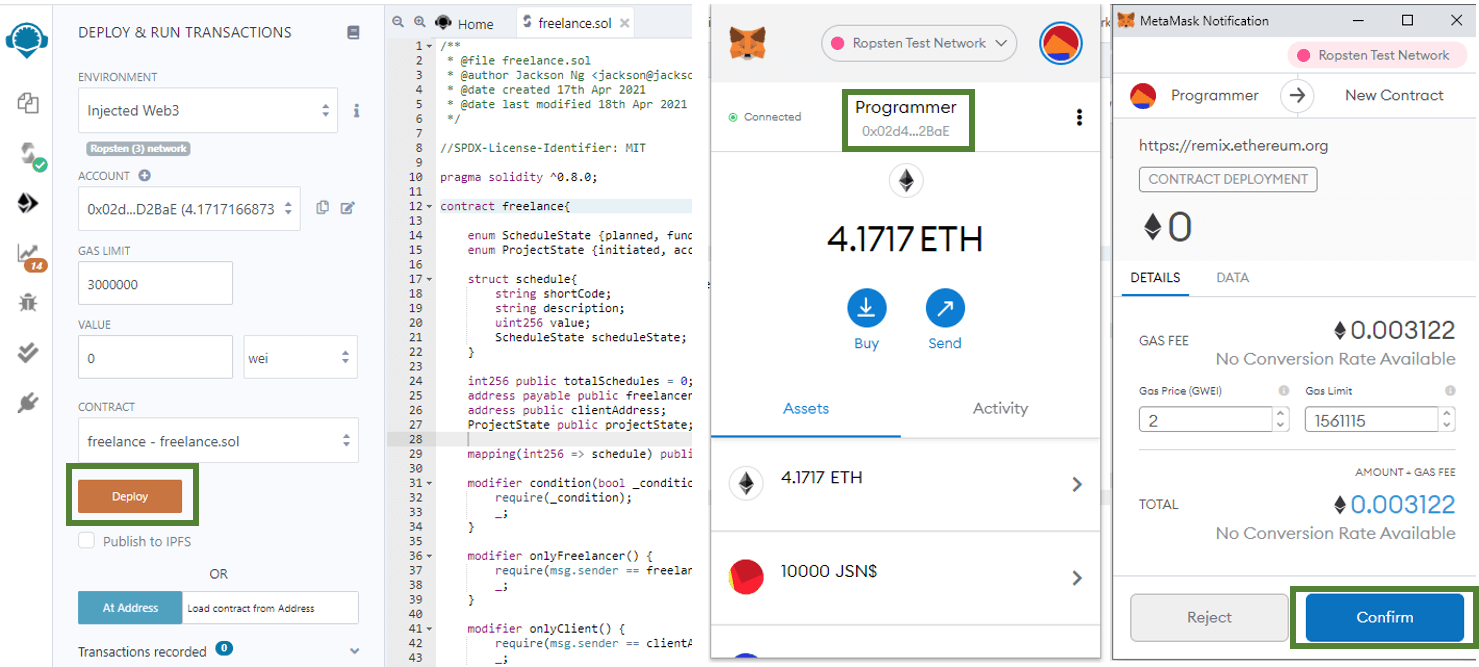
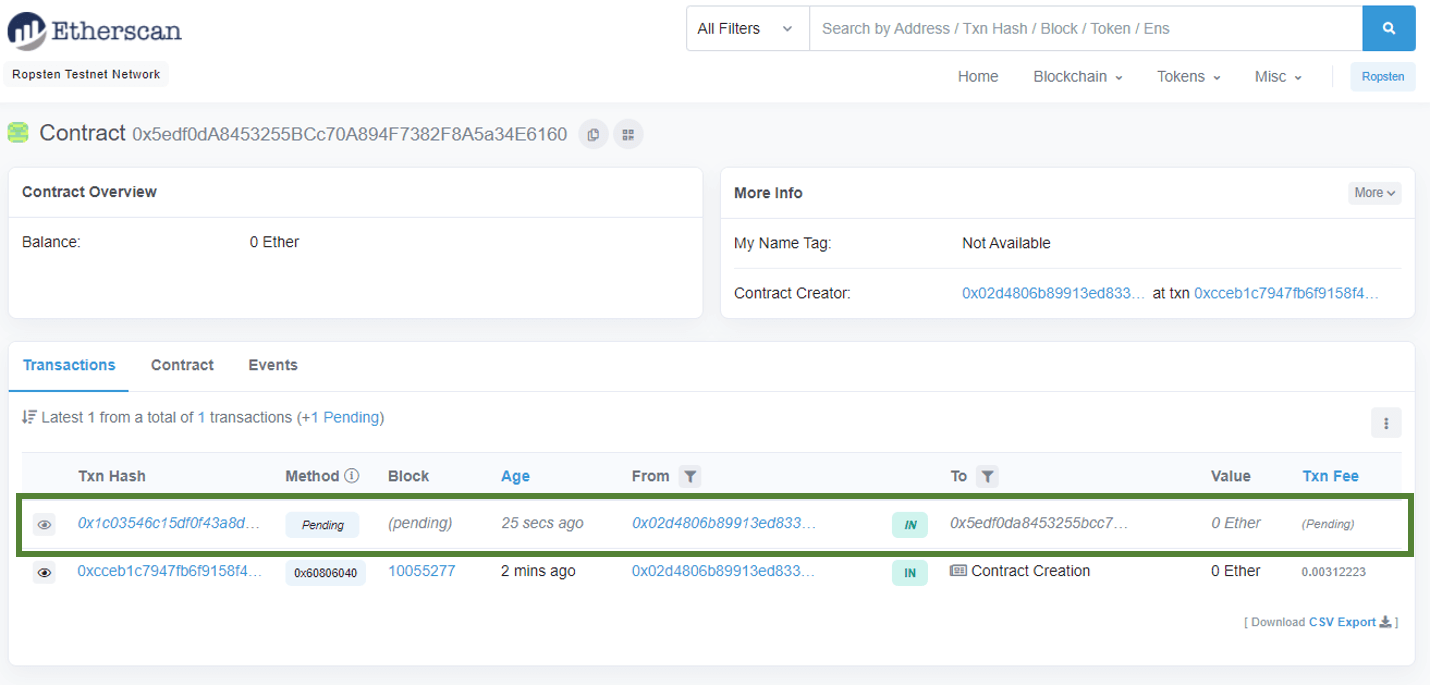
Visit Etherscan if you wish to know if the Freelancer contract has been deployed successfully on the Ethereum Blockchain. In this example, it has been successfully deployed.

The programmer now adds the tasks of the project to the contract. The tasks are as follows:
| S/N | Short Code | Description | Payment Expected |
|---|---|---|---|
| 0 | DSP | Design Phase | 1,250,000,000,000,000,000 Wei (1.25 ETH) |
| 1 | DEV | Development Phase | 2,340,000,000,000,000,000 Wei (2.34 ETH) |
| 2 | UAT | User Acceptance Testing | 3,250,000,000,000,000,000 Wei (3.25 ETH) |
Each task that the programmer adds will follow these processes.
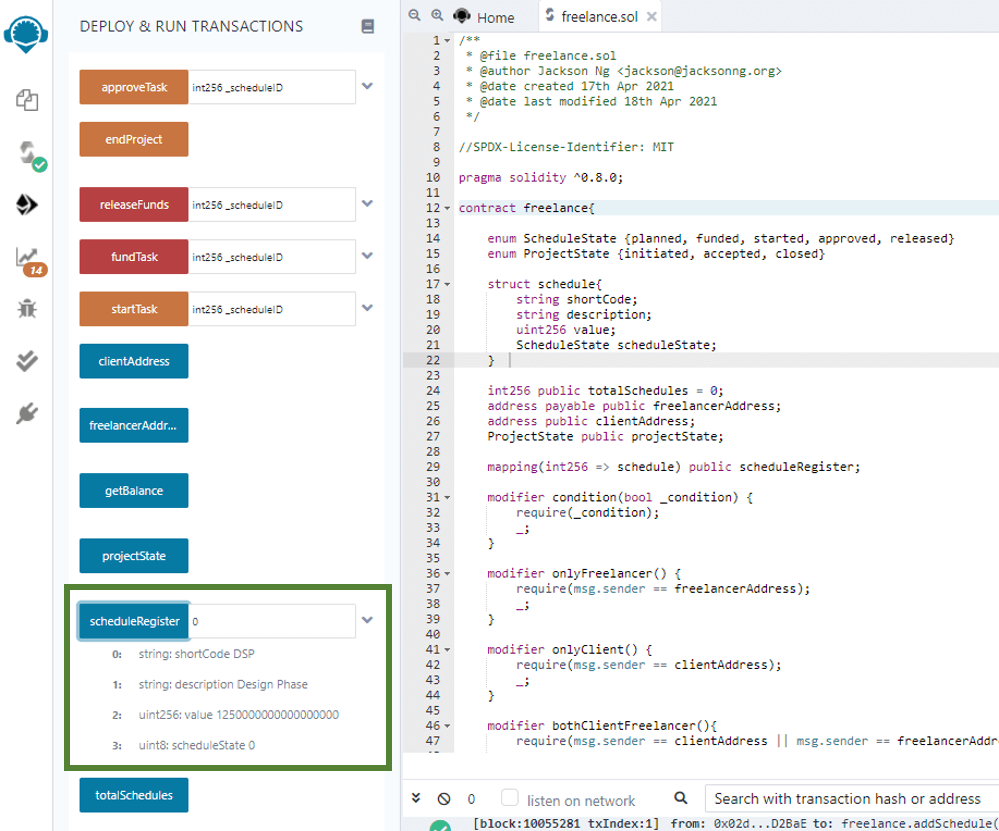
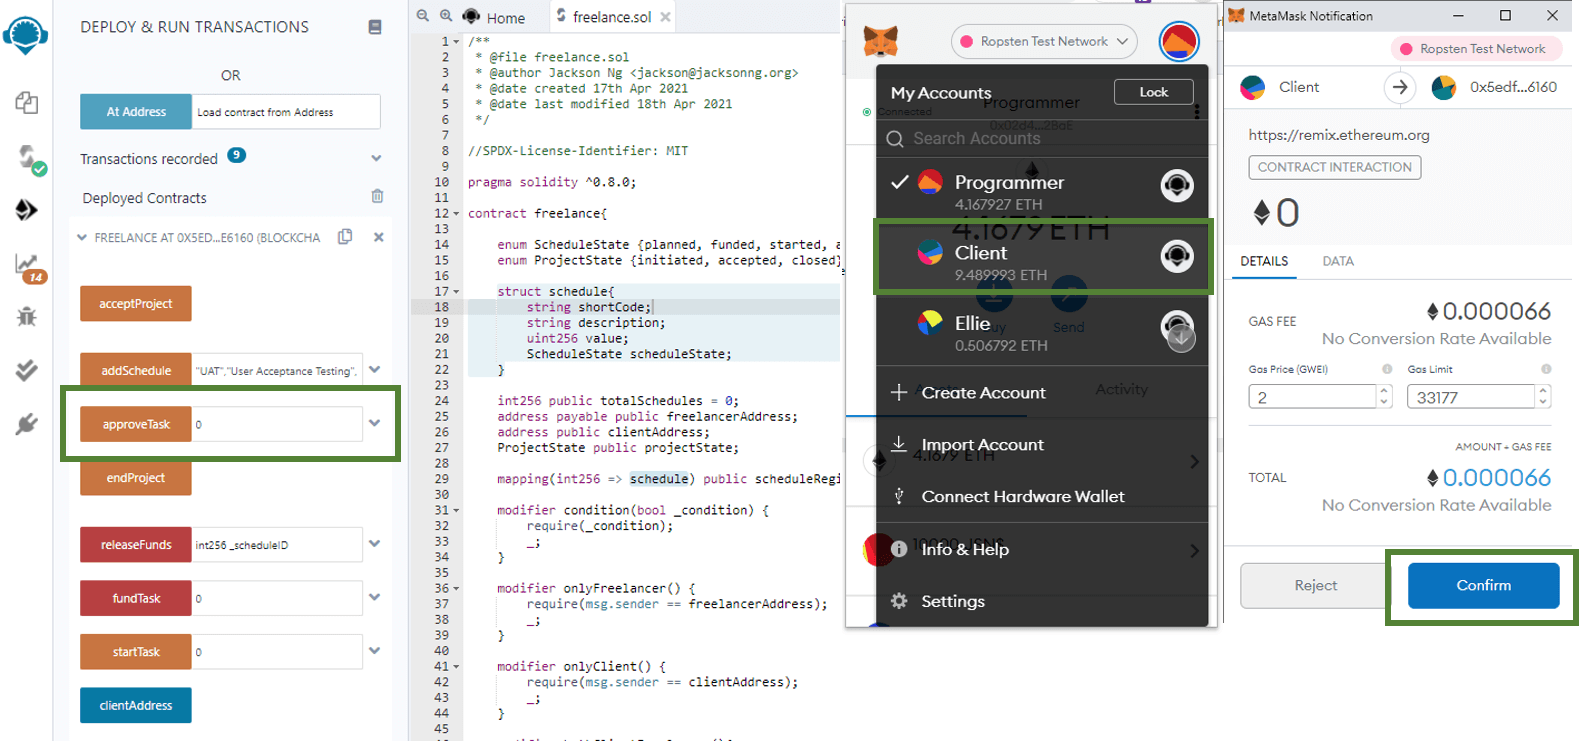
The programmer adds the first task (DSP - Design Phase).

As tasks are added to the Freelancer Smart Contract, you may review their executions on Etherscan.
The programmer may also review the tasks that he has added by entering the serial number of the task and pressing [scheduleRegister].
He then adds the next 2 tasks (DEV - Development and UAT - User Acceptance Testing). When he has finished adding all the tasks of the project, he sends the Smart Contract address to the client. The client proceeds to accept the project.


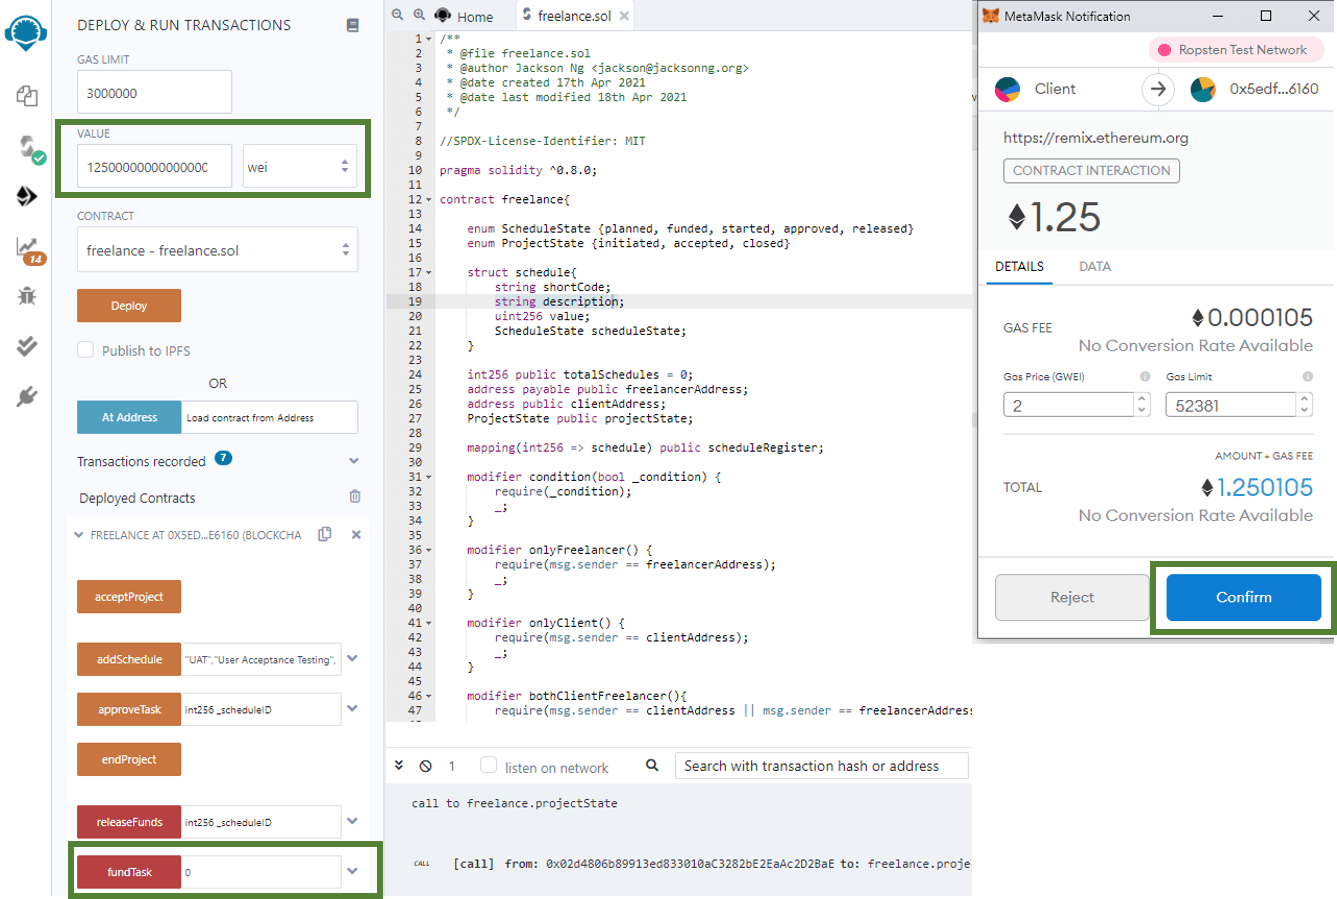
The client then funds each of the tasks (DSP - Design Phase, DEV - Development Phase and UAT - User Acceptance Testing) by depositing the payments in ETHs expected by the programmer.
The client does not need to fund all the tasks at the same time. Here, he funds just the DSP (Design Phase) task with 1.25 ETH (or 1,250,000,000,000,000,000 Wei).
Noted that the funds of 1.25 ETH have been deposited into the Freelancer Smart Contract, the programmer begins working on the DSP (Design Phase) task.
When he is done with the DSP (Design Phase) task, he delivers his work to the client who then approves it.
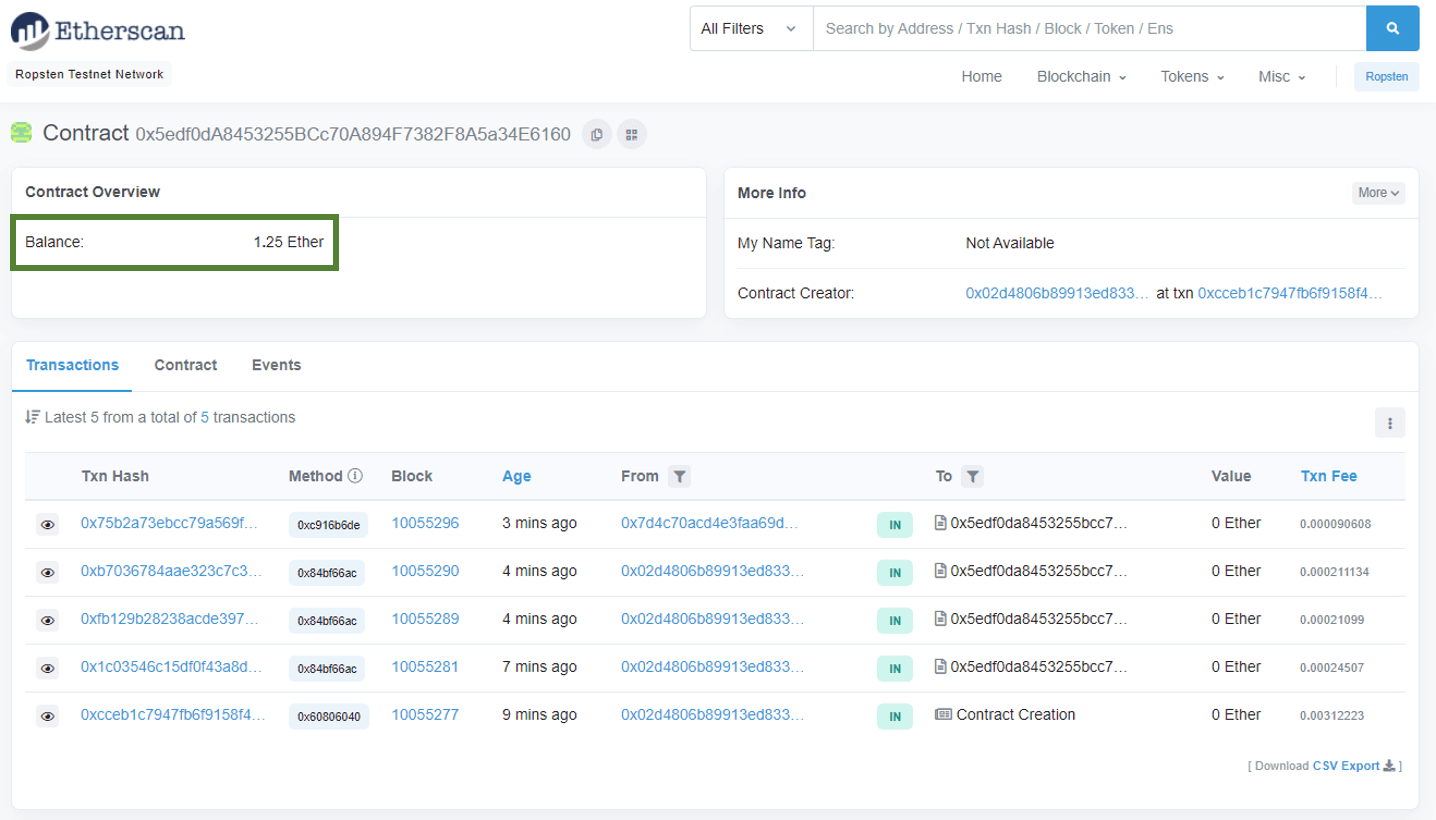
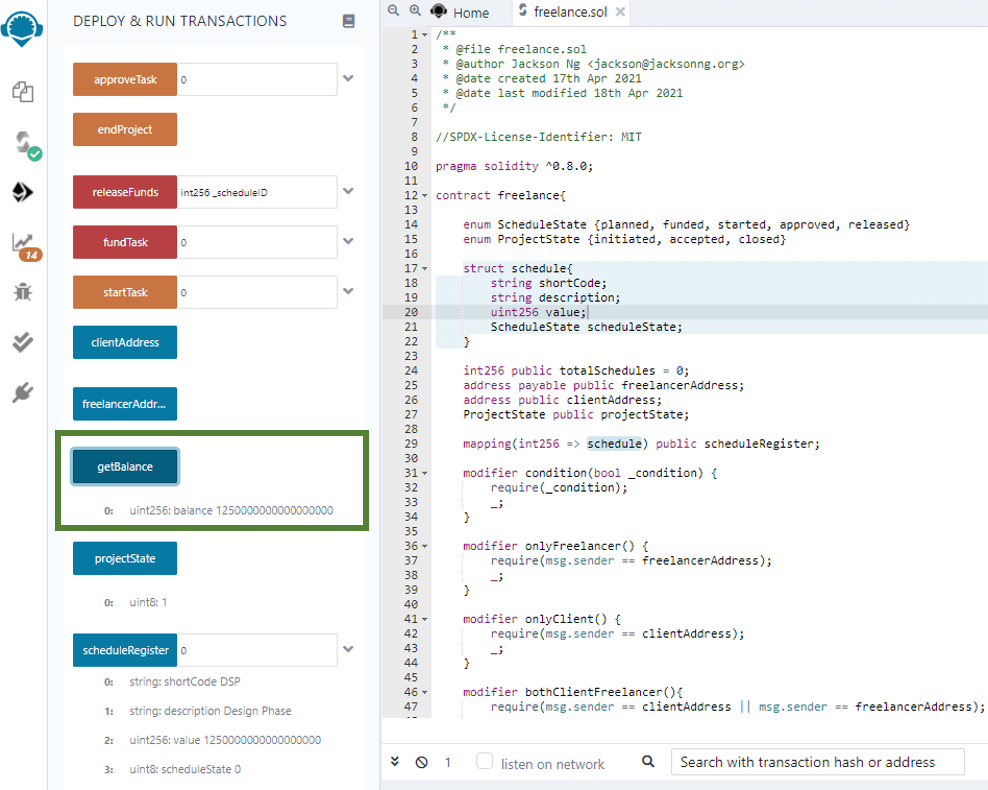
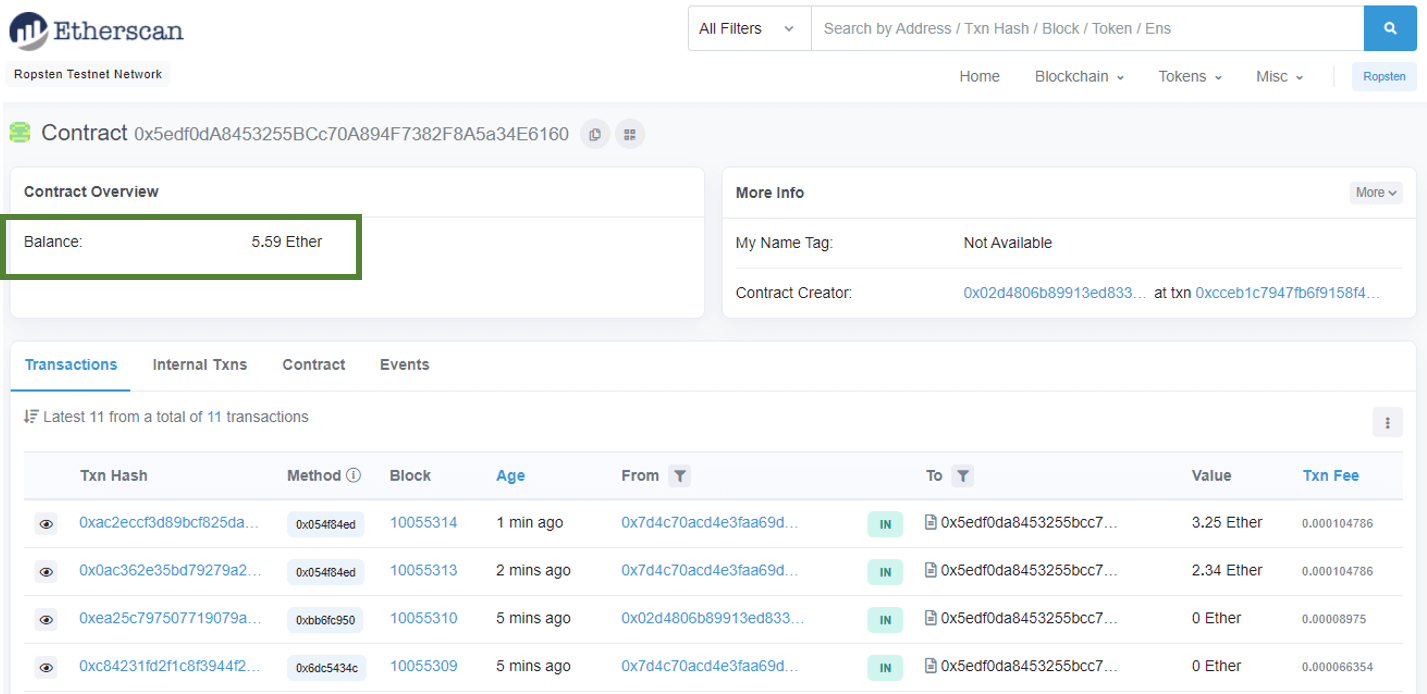
Pressing the [getBalance] button reveals that the Freelancer Smart Contract now contains 1.25 ETH (or 1,250,000,000,000,000,000 Wei).
Since the DSP (Design Phase) task has been completed and approved by the client, the programmer may now trigger a release of the 1.25 ETH from the Freelancer Smart Contract to his digital wallet as payment for the work that he has done so far.


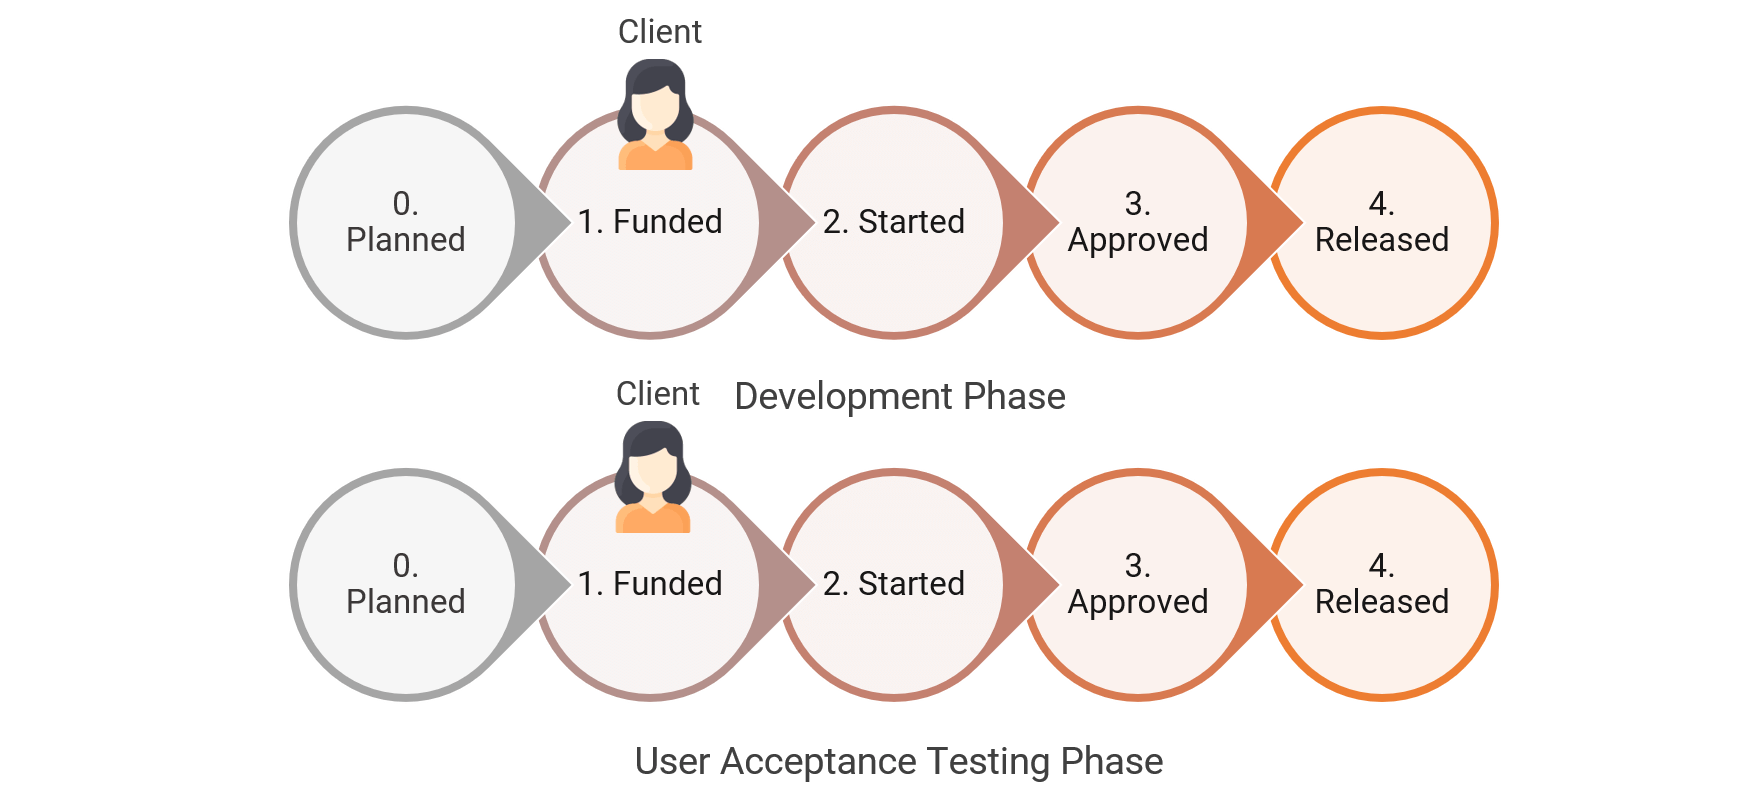
The tasks for DEV (Development Phase) and UAT (User Acceptance Testing) follow the same process as the DSP (Design Phase) task described above.


You may check the Freelancer Smart Contract on Etherscan to confirm that it holds the correct ETH balance after the DEV (Development Phase) and UAT (User Acceptance Testing) tasks were funded by the client.
When all the tasks have been done, approved and funds have been released, the contract should hold no more ETHs.
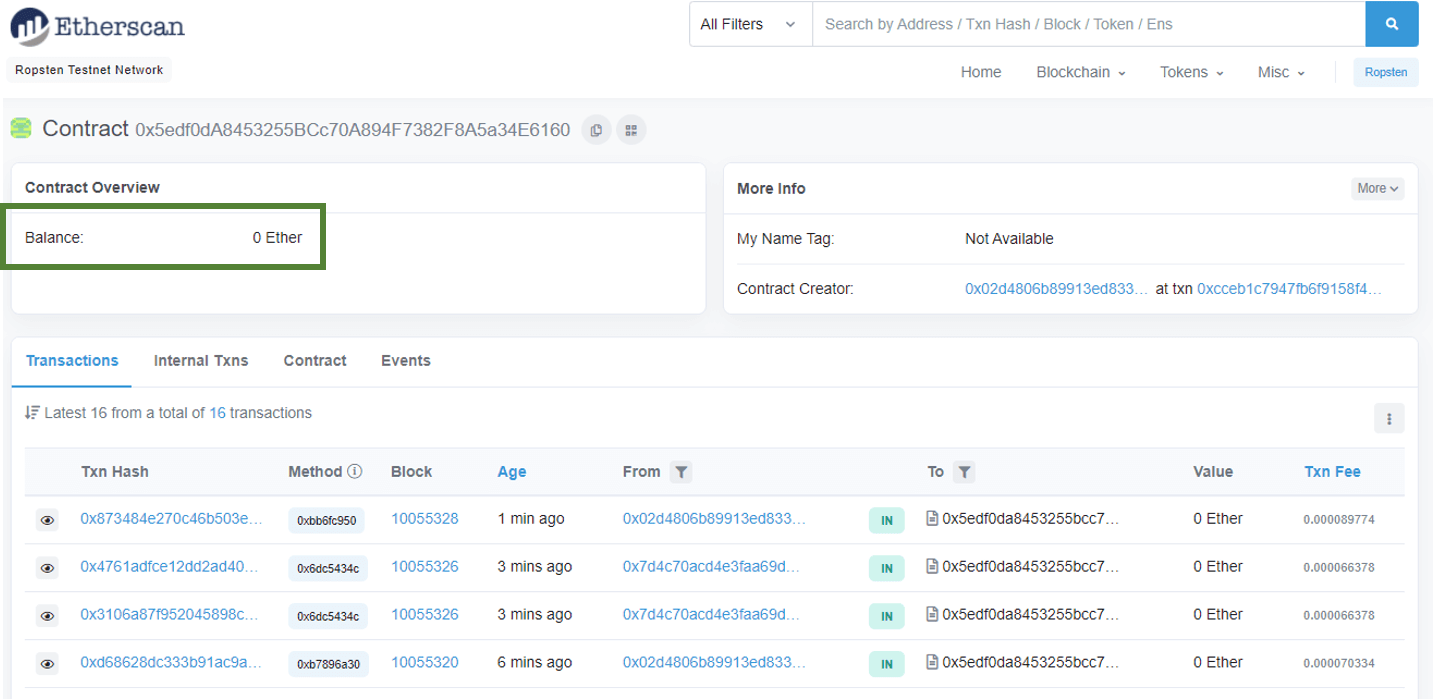
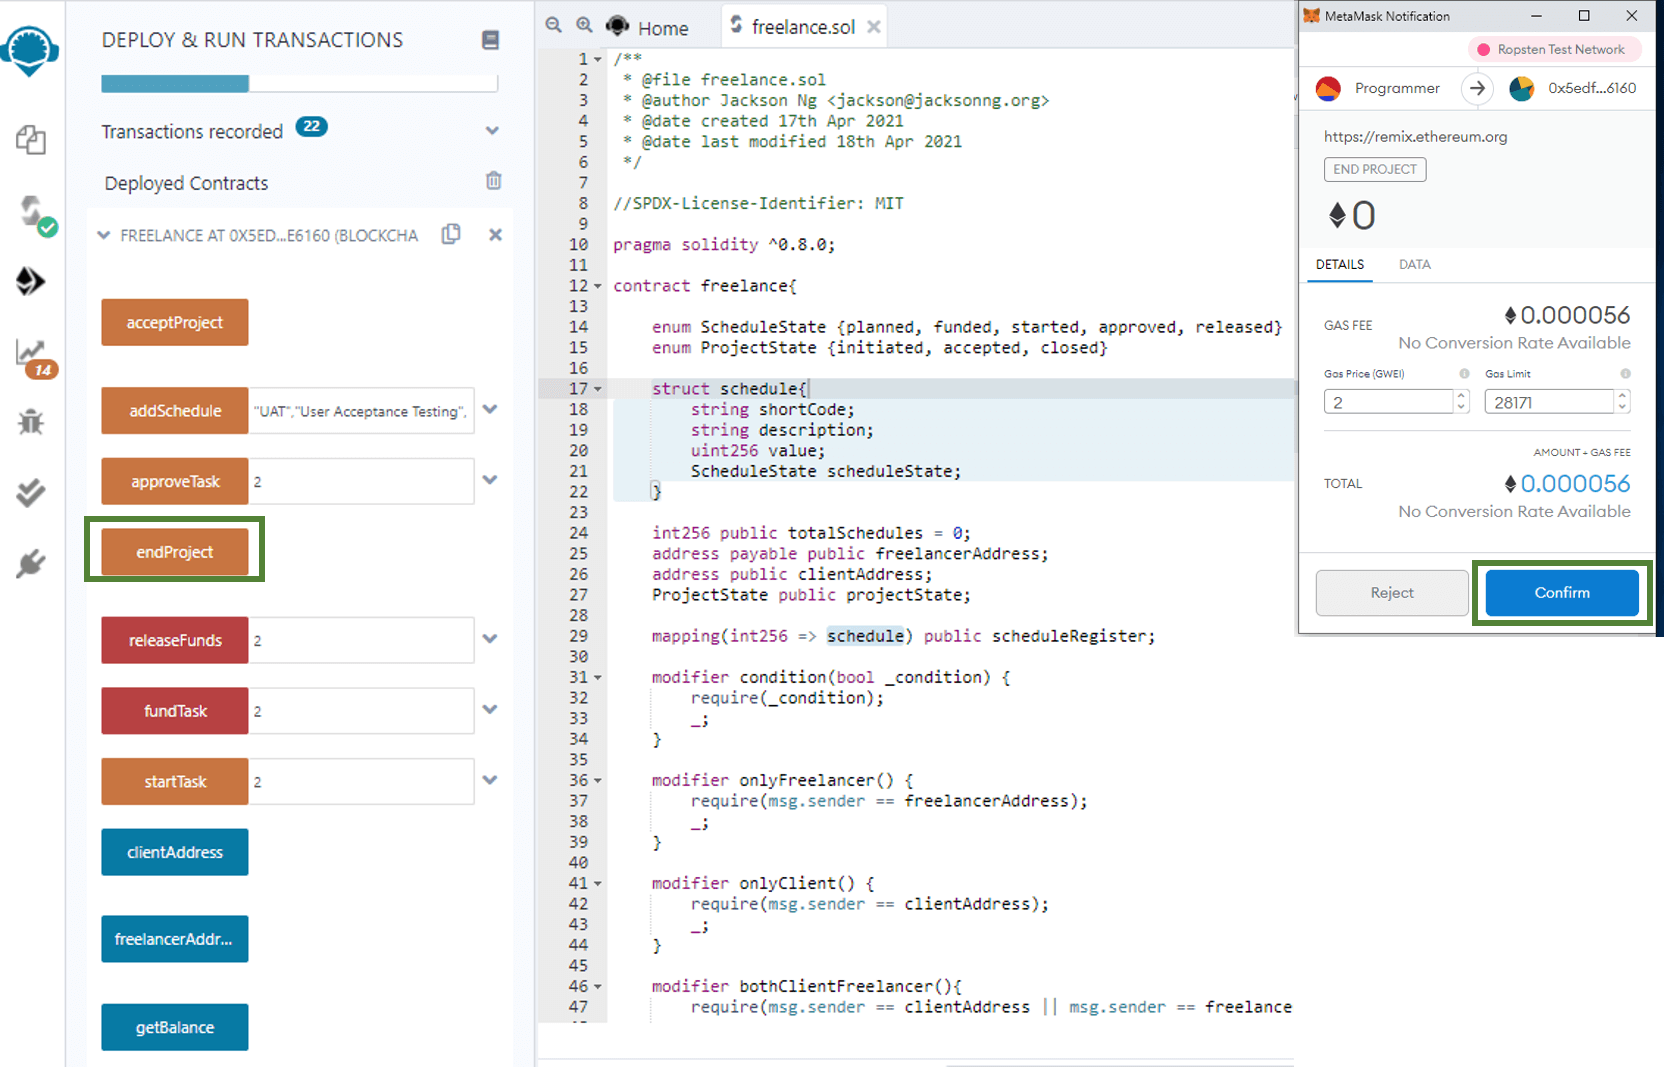
At this point, the project is now ready to be closed. This step may be undertaken by either the programmer or the client. The Freelancer Smart Contract allows this step to proceed only when it no longer holds any ETHs in its balance.
What's Next?
The source codes for this project can be found in my Github repository.
This demonstration is awkward as I am merely executing it in the Remix IDE.
For non-technical users, I should design a slick Decentralized Application (DApp) to let both the programmer and his client interact with the Freelancer Smart Contract.
I have a lot more work to do the complete this series of articles. Over the next few weeks, I will continue to add new parts as follows:
- The Freelancer's Smart Contract: How It Works (this part)
- The Freelancer's Smart Contract: DApp Demo
- The Freelancer's Smart Contract: Solidity Codes Explained
- The Freelancer's Smart Contract: DApp Codes Explained
In the next part of this tutorial, I will explain the Solidity codes behind the Freelancer's Smart Contract. Stay tuned!
If you enjoyed this tutorial, perhaps you may also wish to read:
- Ropsten Ethereum Faucet: I built an Ethereum faucet to give out ETH on the Ropsten network.
- Voting on a Blockchain: An implementation of a Voting DApp on Ethereum.
- Deploy a Private Ethereum Blockchain in 10 Minutes with Kaleido: Getting a private Ethereum Blockchain up and running in a jiffy.
- Smart Contract Explained by Demonstration: A demo of an Escrow Service Smart Contract DApp - in my opinion, the fastest way to explain to a layman, what Blockchain is.
- Ethereum IOT Kid Grounding Device: My attempt to incorporate Blockchain with Internet of Things.
- Lottery as a Smart Contract: Decentralized Lottery, an attempt to build a lottery system on the Ethereum Blockchain.
Photo by Wioleta Zakrzewska on Unsplash
Icons made by Vitaly Gorbachev from www.flaticon.com
