Smart Contract Escrow Dapp - Seller View
This is the first of a 2-part article that explains the codes behind Smart Contract Explained by Demonstration and will be of interest to developers who want to learn how to code a Web3-based DApp to serve as front-end user interface to a Solidity Smart Contract. In particular, this article explains the ways to:
- Execute Smart Contract functions in JavaScript
- Writing and reading from IPFS
In developing this UI, I used several 3rd party libraries, namely:
In this part, I will focus on the UI for the seller.
The StartEscrow smart contract used by the DApp can be found here and I have previously written an article about how it works here.
You may find the complete seller's source codes in my Github repository here. In the sections that follow, I will refer to the line numbers from my codes in Github.
Initialization
if (typeof web3 !== 'undefined') {
     web3 = new Web3(web3.currentProvider);
}
else
{
     // set the provider you want from Web3.providers
     web3 = new Web3(new Web3.providers.HttpProvider("http://localhost:8545"));
}
Lines 91 to 96 initialize web3. Here, the web3 library checks if the UI is executed from a web browser that has a web3 provider. If you have MetaMask installed on your Chrome browser or are running this page within Status, the mobile app for Dapps execute, this will work. Or else, web3 will attempt to look for a running Web3 provider in your machine to use.
ipfs = new window.IpfsApi('ipfs.infura.io', '5001', { protocol: 'https' });
ipfs.id(function(err, res) {
     if (err) throw err
              console.log("Connected to IPFS node!", res.id, res.agentVersion, res.protocolVersion);
});
web3.eth.defaultAccount = web3.eth.accounts[0];
var Buffer = window.IpfsApi().Buffer;
Lines 98 to 104 initialize IPFS, where the seller's product image will be stored. Here, we are using a public IPFS instance on Infura. To learn more about IPFS, you may refer to the article that I wrote previously to demonstrate how IPFS works together with Solidity and JavaScript.
web3.eth.defaultAccount = web3.eth.accounts[0];
Line 106 says that this Dapp will use the default account in your Web3 provider. For example, if you are using MetaMask with Chrome to run this Dapp and have several wallets, it will use ETH from your first wallet.
var PurchaseContract = web3.eth.contract(
     [
        { "constant": true,
          "inputs": [],
          "name": "seller",
          "outputs": [
            .....
      ]
 );
There are 2 Smart Contracts within StartEscrow.sol. Lines 108 to 204 states the Application Binary Interface (ABI) for the first Smart Contract - PurchaseContract. The ABI of a Smart Contract can be obtained by copying and pasting the Smart Contract codes into Remix and compiling your contract.
var StartEscrowContract = web3.eth.contract(
      [
          { "constant": false,
            "inputs":
            [
               ......
      ]
);
Lines 242 to 348 states the ABI for the second Smart Contract - StartEscrowContract.
var StartEscrow = StartEscrowContract.at('0x05525d0692794ee5a19fa8b259f1100358ffc882');
Lines 349 states the address of my running StartEscrowContract. You can view it by copying and pasting this address into Etherscan Ropsten. This DApp allows us to start as many instances of PurchaseContract as we wish.
Retrieving Purchase Contracts
//retrieve all the contracts from the blockchain first
StartEscrow.getContractCount(function(error, result){
      if(!error){
               console.log(JSON.stringify(result));
               var contractCount = Number(result);
               var t = $("#contractTable").DataTable(); t.clear();
               for (var i = 0; i<contractCount; i++){
                           StartEscrow.contracts(i,function(error, result){
                                         if(!error){
                                               t.row.add([result]).draw(false);
                                               console.log(JSON.stringify(result));
                                         } else{
                                               console.error(error);
                                         }
                           });
              }
     }
    else{
              console.error(error);
     }
});
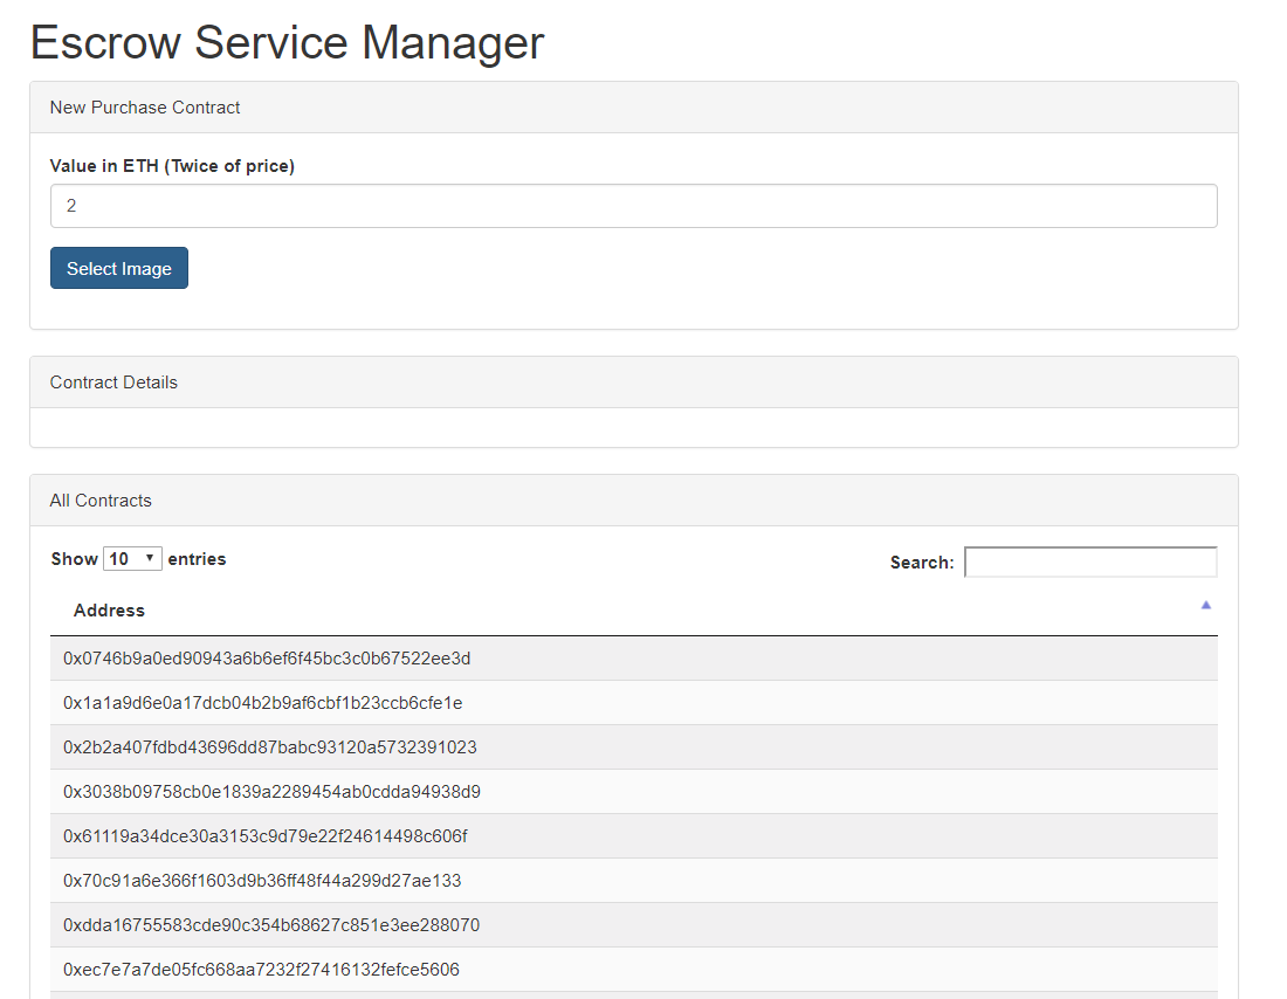
Lines 353 to 374 retrieve all Purchase Contracts that have been started by StartEscrow. It initializes the datatable, reads every instances of Purchase Contracts and add their addresses to the table. You can see an example in the "All Contracts" section below.

Posting an Item for Sale
$("#file-upload").change(function() {
     $("#loader").show();
     var reader = new FileReader();
     reader.onload = function() {
          mybuffer = Buffer.from(this.result);
          ipfs.files.add(mybuffer, function(err, result){
               if (err) {
                    console.log("Error");
               }
               else {
                    ipfsHash = result[0].hash;
                    StartEscrow.newPurchase(ipfsHash, {value: $("#price").val()*1000000000000000000, gas: 1000000, gasPrice: web3.toWei(2, 'gwei')},
                    function(error, result){
                           if(!error){
                                   console.log(JSON.stringify(result));
                           }
                           else{
                                   console.error(error);
                           }
                      });
                }
             });
    }
    reader.readAsArrayBuffer(this.files[0]);
})
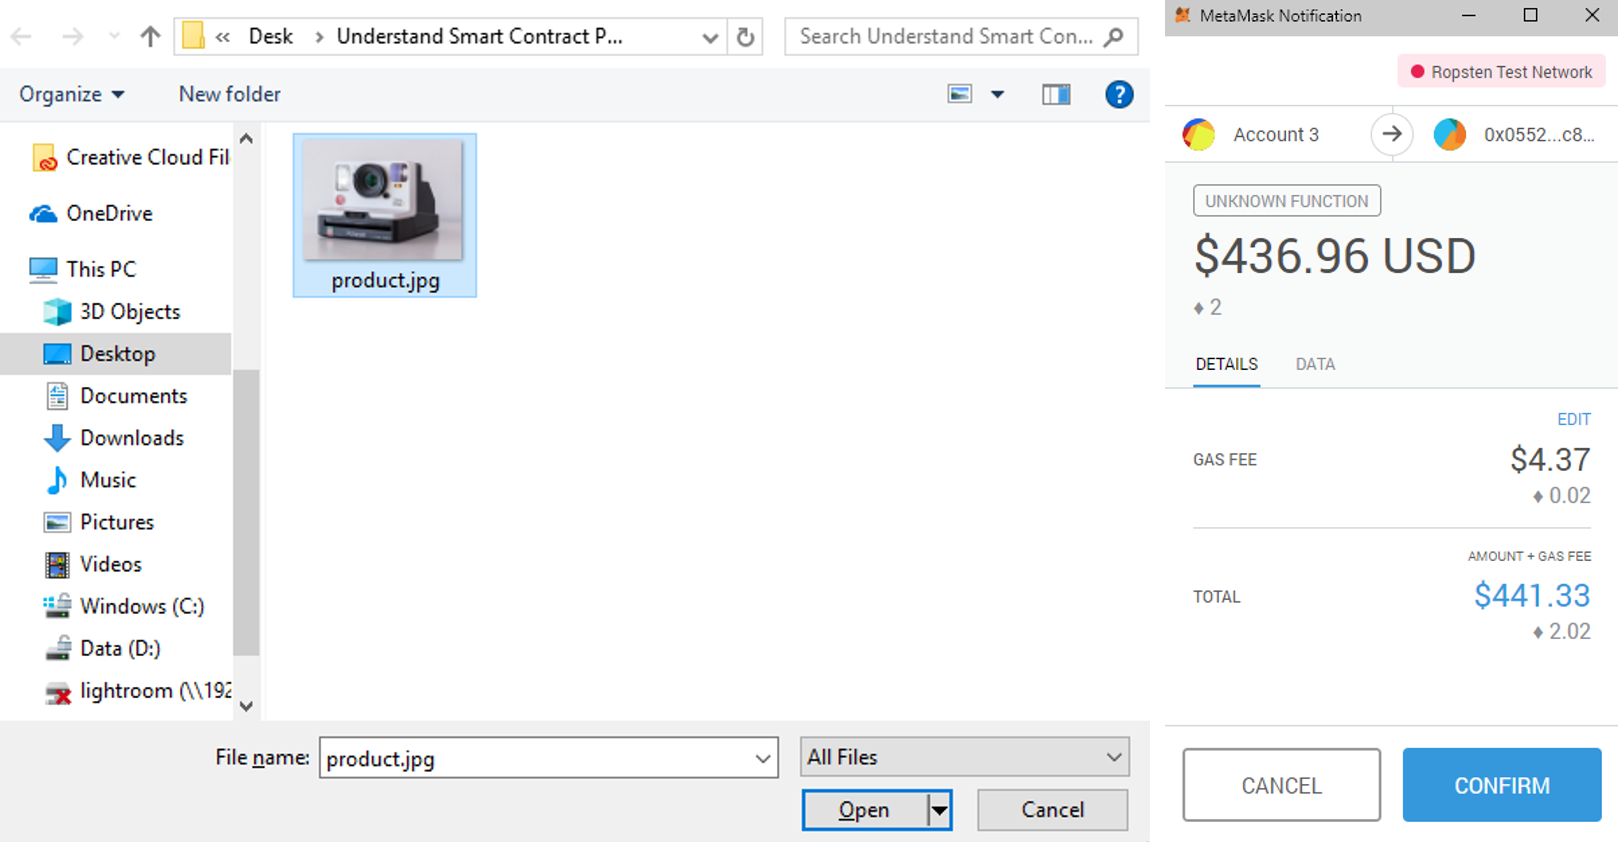
("#file-upload").change(); is executed after the user selects an image from his machine and enters the amount of ETH to sell this item for.
Lines 400 to 425 above reads the image, turns it into a buffer and adds it to the IPFS file system. The IPFS file system generates a hash code based on the content of the file upload. StartEscrow.newPurchase is executed by providing the IPFS hash, the price that this item is sold for and the gas price to stake to run the contract as parameters.


Watching for Successful Purchase Contract Execution
var newPurchaseContractEvent = StartEscrow.newPurchaseContract();
    	newPurchaseContractEvent.watch(function(error, result){
            if (!error)
                {
                    $("#loader").hide();
                    $("#contractaddress").html("Contract: " + result.args.contractAddress);
                	loadContractDetail(result.args.contractAddress);
                	var t = $("#contractTable").DataTable();
                    t.row.add([result.args.contractAddress]).draw(false);

                    ipfs.pin.add(ipfsHash, function (err) {
                    	if (err){
							console.log("cannot pin");
                        }
                    	else{
                        	console.log("pin ok");
                        }
                    });

                } else {
                    $("#loader").hide();
                    console.log(error);
                }
        });
Lines 375 to 398 wait and watch while the Purchase Contract executes. Once the Purchase Contract executes, it:
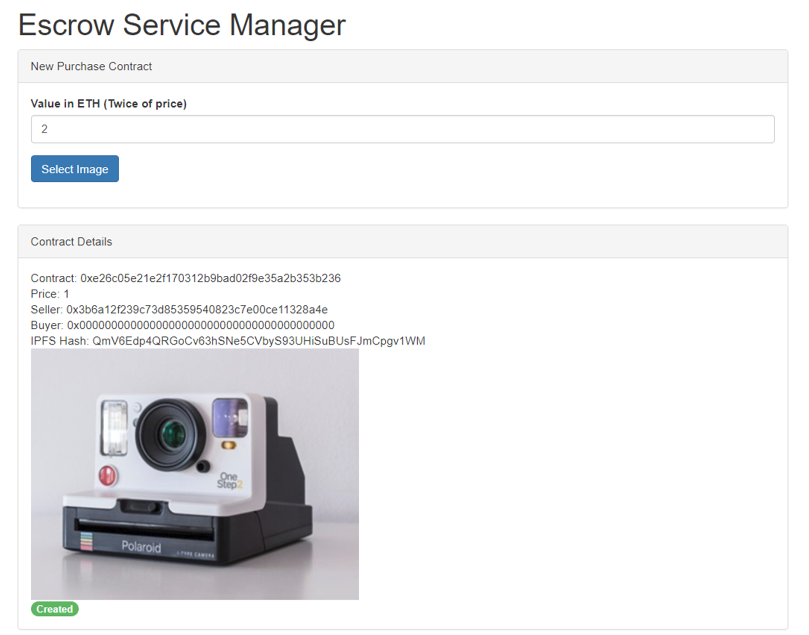
- updates the Contract Details section with the details of this contract
- add the address of the contract to the datatable.
- pin the image to IPFS so that it gets written permanently to the file system.

Clicking a Purchase Contract Address
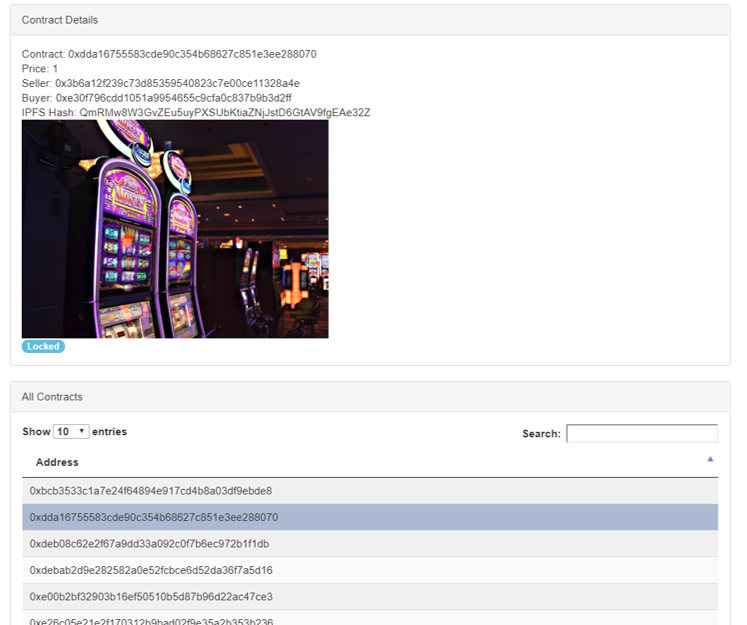
The Seller DApp allows the seller to monitor the Purchase Contracts that he has executed. To do so, click on an address in the table and read the Contract Details.

$(document).ready( function () {
    		var table = $('#contractTable').DataTable();
           	$('#contractTable tbody').on( 'click', 'tr', function () {
        		if ( $(this).hasClass('selected') ) {
            		$(this).removeClass('selected');
        		}
        		else {
            		table.$('tr.selected').removeClass('selected');
            		$(this).addClass('selected');
        		}
    		} );

			$('#contractTable tbody').on('click', 'tr', function () {
				var data = table.row( this ).data();
            	$("#contractaddress").html("Contract: " + data[0]);
				loadContractDetail(data[0]);
			} );
		} );
Lines 72 to 89 initializes the datatable. It also states what happens when the user clicks on one of the contract address in the datatable - loadContracDetails() will execute to load the details of this Purchase Contract in the Contract Details section.
function loadContractDetail(address){
    	var Purchase = PurchaseContract.at(address);

    	Purchase.value(function(error, result){
   			if(!error){
            	console.log(JSON.stringify(result));
       			$("#itemvalue").html("Price: " + Number(result)/1000000000000000000);
            }
   			else{
       			console.error(error);
            }
		})/18;

    	Purchase.seller(function(error, result){
   			if(!error){
            	console.log(JSON.stringify(result));
       			$("#seller").html("Seller: " + result);
            }
   			else{
       			console.error(error);
            }
		});

        Purchase.buyer(function(error, result){
   			if(!error){
            	console.log(JSON.stringify(result));
       			$("#buyer").html("Buyer: " + result);
            }
   			else{
       			console.error(error);
            }
		});
        Purchase.ipfsHash(function(error, result){
   			if(!error){
            	console.log(JSON.stringify(result));
       			$("#ipfshash").html("IPFS Hash: " + result);
       			$("#ipfsimage").html("<img src=https://gateway.ipfs.io/ipfs/" + result + " width='400'>");
            }
   			else{
       			console.error(error);
            }
		});

        Purchase.state(function(error, result){
   			if(!error){
            	console.log(JSON.stringify(result));
            	if (Number(result) === 0){
                	$("#state").html('<span class="badge progress-bar-success">Created</span>');
                }
            	else if (Number(result) === 1){
                	$("#state").html('<span class="badge progress-bar-info">Locked</span>');
                }
            	else {
                	$("#state").html('<span class="badge progress-bar-danger">Inactive</span>');
                }
            }
   			else{
       			console.error(error);
            }
		});
    }
Lines 427 to 488 defines loadContractDetail() does. loadContractDetails() accepts the address of a Purchase Contract as a parameter. It then calls the corresponding Smart Contract function to retrieve and populate the Contract Details section with the relevant values:
Purchase.value()- The value of this item.Purchase.seller()- The address of the seller.Purchase.buyer()- The address of the buyer.Purchase.ipfsHash()- the hash value of the item's image.Purchase.state()- The current state of this Purchase Smart Contract
What's Next?
In the next part, I will examine the codes behind the buyer's Dapp.
Photo by Alex Person on Unsplash


